About us

World Best Blog Site for Solve your Computer Problems,Download Free Register Software And Games, Send free SMS Online, Check Information about yourself,Watch Live TV,Get Icons,Online Games And Muck More Join Me On Ara websites.
Showing posts with label Blogger. Show all posts

Friday, 11 July 2014

Remove - Subscribe to: Posts (Atom) from Blogger

How to remove subscribe to: Posts (Atom) link?
Step 1. Go to your Dashboard > Template > Edit HTML

Step 2. Click anywhere inside the code area, then press the CTRL + F keys to open Blogger' search box


Step 3. Find (CTRL + F) this line:
<b:include data='feedLinks' name='feedLinksBody'/>
Step 4. Remove it and click on the Save Template button to save the changes. That's it!

This should remove subscribe to: posts (atom) link.

How to Remove "Powered By Blogger" Attribution from Blogger?


So Now  we will find the easiest and quickest way to remove this Powered By Blogger

STEPS

  1. Go to Blogger Dashboard.
  2. Now click on your Blog Title.
  3. Navigate to Template tab.
Blogger Template
Note: Before editing your template, you may want to save a copy of it. Back Up Your Template.


4. Click on Edit HTML button.

5. Click Proceed button to continue.

6. Now you have to find the code of attribution element. Search for the code snippet similar to below in the template,
<b:widget id='Attribution1' locked='true' title='' type='Attribution'>

7. Now alter the attribute locked value to false in the line of code, which cause element unable to remove.
i.e: <b:widget id='Attribution1' locked='false' title='' type='Attribution'>


8. Now Save template.
Enjoy :-) Enjoy :-) Enjoy :-)

TO ADD 
Blogger Layout

1. Navigate to Layout tab from left pane.


2. Find Attribution element bottom of the page.

Blogger Attribution Element


3. Click on Edit link correspond to the Attribution element.

14. Now click Remove button on pop up window.

15. Now Attribution element has been removed. You can add another element using bottom Add a Gadget link to add custom attribution or any other element.

6. Click Save arrangement button.

Enjoy :-)

Change Older Posts,Home and Newer Post Links to Buttons in Blogger

In Blogger Blogs, there are newer posts, home and older posts links below every post. That's been set by default by blogger , but you can change them to buttons as mentioned above or the text of your choice. e.g.. next page or previous page.

In this tutorial I'll teach you how you can change these links into buttons or change the text to your choice.
So let's start changing these links by some very simple steps.

Also Read Procedure to  Remove "Subscribe to: Posts (Atom)" Link on Blogger?

Change Older Posts,Home and Newer Post Links to Buttons in Blogger


Start the procedure by following below steps:

Log-in to Blogger dashboard
Go to Template >> HTML >> Check the Expand Widget Template

For Previous Post Button search for below code (tip: use CTRL+F)
<data:newerPageTitle/>
Replace it with this code below:
<img src="Image URL"/>


For Next Post Button search for this code:
<data:olderPageTitle/>
Replace it with this one below:
<img src="Image URL"/>


For Home Button search for this code:
 <data:homeMsg/>
The above code may appear twice, so both times replace it with below code:
<img src="Image URL"/> 

Now save your template and you've done almost all steps :-)

Remember this


  • Change bold img tag URL's with your desired Button URL's or if you just want to change the text then only write the desired text (do not write any URL.)
  • You can download the buttons from Google And from Our blog Click her for the buttons then upload it on your blog new post to get the URL on the images, then copy that URL's and paste them in these codes and then visit your Blog and see the butons working.

Do You have any questions regarding this post Or Anything else   than comment below..>>>>|||

Thursday, 19 June 2014

How to Use Character Entities in CSS, HTML and JavaScript

Sometimes, when using scripts, we must write special characters like accents by using a special set of codes called character entities, however these don't always look good or we get a question mark or other strange symbols. Usually, this is solved if the character encoding is done right but the logic may not always work.

In Blogger, special characters most of the time appear correctly, but when it is about other services, like external files, things can get complicated.

For example, this usually looks good and when you click on this link, you should see the letters in the right way:
alert(" á é í ó ú  ☺ ✛ ❤ ");
If we are trying to use other method and we want to use this type of characters, sometimes we need to write them in a special format called escape sequence which is nothing but a backslash followed by a letter and a number in hexadecimal format. In the case of common characters or accents, it would be \x followed by two hex digits:
\xe1 is the letter á
\xe9 is the letter é
\xed is the letter í
\xf3 is the letter ó
\xfa is the letter ú
Other combinations generate special characters:
\n is a line break
\t is the tab character
\' is single quote
\" is double quote
\\ is a back slash
Or we can use \u followed by the Unicode character code expressed as four hexadecimal digits:
\u00e1 is the letter á
\u00e9 is the letter é
\u00ed is the letter í
\u00f3 is the letter ó
\u00fa is the letter ú
this will allow us to see correctly what we couldn't before if we were using some other services:
alert(" \u263a \u2764 \u271b ");
On this page you can find a comprehensive list of all the characters, both symbols and different alphabets.
Although rare characters are not often used in the CSS, there is a case when they are necessary as well, like when using the content property with the :after and :before pseudo-elements.

The same criteria applies there, but we only need to add a backslash followed by the four-digit hexadecimal code. For example:
content: ":\24d1\24d4\24d5\24de\24e1\24d4";

content: ":after  \263a  \2724  \2602";
:ⓑⓔⓕⓞⓡⓔ
:after ☺ ✤ ☂

Remember that IE doesn't understand the :before pseudoclass with content, and you would have to set the list-style-type property as none, or you would get 2 bullets in CSS compliant browsers.

How to Use Cookies in Javascript

Each time we visit a website, cookies can be stored to 'remember' things that we do while browsing a page. This may happen, for example, when we visit a page where we have to login with an username and a password. In this case, after verifying that the login is correct, usually a cookie is recorded on our computer.

An example would be the popular page of Google. This search engine allows users to choose how many search results they want to see on each page. Thanks to a cookie, this configuration remains unchanged for each computer, even after rebooting several sessions. Despite this, it is good to remove them from time to time because, although, some will expire being erased automatically after a while, some of them will never do so.
cookies with javascript, blogger tricks

Like many other things, cookies may suffer a poor use and hence their bad reputation. For instance, some websites can store and study the browsing habits of a user without their knowledge. This is why most browsers already include a system to filter them and can decide if they will provide some privacy or not.


There could be other ways to use cookies but a server could do this with JavaScript. Below we have a simple script that can be used as many times we want, even for different purposes. Basically, what the following script does is to create three functions: the first one is to set a cookie, the second one is to read it, and the last one is to erase it. We can apply it in Blogger by accessing the template HTML and add it just before the </head> tag:
<script type='text/javascript'>
//<![CDATA[

// Set cookie
function setCookie(name, value, expires, path, domain, secure) {
document.cookie = name + "=" + escape(value) +
((expires == null) ? "" : "; expires=" + expires.toGMTString()) +
((path == null) ? "" : "; path=" + path) +
((domain == null) ? "" : "; domain=" + domain) +
((secure == null) ? "" : "; secure");
}

// Read cookie
function getCookie(name){
var cname = name + "=";
var dc = document.cookie;
if (dc.length > 0) {
begin = dc.indexOf(cname);
if (begin != -1) {
begin += cname.length;
end = dc.indexOf(";", begin);
if (end == -1) end = dc.length;
return unescape(dc.substring(begin, end));
}
}
return null;
}

//delete cookie
function eraseCookie (name,path,domain) {
if (getCookie(name)) {
document.cookie = name + "=" +
((path == null) ? "" : "; path=" + path) +
((domain == null) ? "" : "; domain=" + domain) +
"; expires=Thu, 01-Jan-70 00:00:01 GMT";
}
}

//]]>
</script>
Once done, in order to set a cookie, we only need to put the name and the value in quotes when we call the function. Additionally, we will set the expiry date by getting the current Time (in milliseconds) and add the required number of minutes (in milliseconds):
var expiration = new Date();
expiration.setTime(expiration.getTime() + 10000); //Expire after 10 seconds
setCookie("cookiename","hello",expiration);
}
The above code sets a cookie called cookiename, with the hello value and set its expiry date to 10 seconds after it has been set (10000 milliseconds = 10 seconds). If we want to restore the value of this cookie, then we should use the second function with the cookie name:
var checkCookie = getCookie("cookiename");
By adding this code below <body>, we created a cookie with the value 'hello' which can be shown on the screen if we want to. The cookie will disappear after 10 seconds:
<script type='text/javascript'>
var expiration = new Date();
expiration.setTime(expiration.getTime() + 10000);
setCookie("cookiename","hello",expiration);
var checkCookie = getCookie("cookiename");
document.write(checkCookie);
</script>
The erase function is used in the same way as the one for reading just by clicking on the name of the cookie. The setCookie values for 'domain' and 'secure' are not utilized. Use 'domain' on the Javascript cookie if you are using it on a subdomain, where the cookie is set on the widgets subdomain, but you need it to be accessible over the whole yoursite.com domain.

The combination of these three functions will allow us to handle cookies for specific purposes, as we will see in the near future.

How to Share Blogger Posts or Pages to Google+

When you share Blogger posts/pages to Google+, an entirely new group of people will be able to find and follow you. Right now, if you access your Blogger dashboard, you'll notice that there's a Google+ tab which can be used to connect your blogs with your Google+ profile or page. If your Blogger blogs haven't already been integrated with a Google+ profile, you can go anytime to the Google+ tab and click on the Get Started button:

get started with google+

It's important to note that once you've upgraded your blog to connect with Google+, the posts or pages published on your blog will be listed on your personal Google+ profile. However, you have the option to select whether your content will be shared on your Google+ Profile or Page and associate some blogs with a Google+ page, while keeping other blogs connected with your profile.

How to associate your blog with a Google+ page


In some cases, you may want to associate a blog with the Google+ Page for your brand, business or organisation, rather than your personal profile. For this, simply access your Blogger dashboard, visit the Google+ tab and there you can swap the Google+ connection from using your profile page to a Google+ page linked with your account:


On the right, you'll have the following options:

- Automatically share after posting: This option is enabled by default on all blogs linked to Google+. When you publish a blog post or page, a snippet will automatically be shared publicly on your Google+ page or profile. You can disable this setting just by unchecking this box.
- Promote to share after posting: If you don't want your post to be published automatically, then you can check this option. This option will allow you to share only some blog posts, or share to specific circles.
- Use Google + comments on this blog: This option enables the new Google + comment system on your blog. This is also a new feature provided by Google.

Share Blogger posts or Pages on Google+

If you have the Prompt to share after posting option checked, next time you publish a blog post, you'll see a share box inviting you to share your post with your Google+ followers. Note that the default circle is set to "Public" but you can modify your circles every time you choose to share.

share post on google plus

Once you click the Share button, this post will appear on the profile or page to which you have connected your blog. Keep in mind that if you have posts scheduled to be published later, you will no longer be asked to publish to your Google+ stream. In this case, you can choose to Share your post/page at any time by clicking the Share link beneath a post or page.

share blogger posts on google+

You can also click on this option each time you want to share only certain posts, or if you want to retroactively share posts and you don't want to constantly change the setting.

As soon as you've chosen to use your Google+ profile on your blog, you can start sharing your content on Google+. If you haven't yet made the switch, click on this link to get started.

By Ara

How to Enable Google Plus Comments in Blogger |Ara

How to Enable Google Plus Comments in Blogger

Long time ago, Google proudly announced their new integrated commenting system which is now available for users who have created a Google+ profile and connected it with their Blogspot blogs. This way, Blogger users will be able to use Google+ as a commenting system for their blogs, while comments from Google+ will automatically appear on their blogs.
google+ speech ballon

For those who haven't yet upgraded the Blogger profile to a Google+ profile, here's a tutorial on how to associate a blog to a Google plus page. Once you have connected a blog to a Google+ profile, you'll have a new "Use Google+ Comments on this blog" setting on the Google+ tab of your blog. To enable the Google plus commenting system, just check the box next to this setting:


As soon as you've enabled the feature through your Blogger Dashboard, you'll have the following features:

- Threaded commenting system: the threaded system will allow a reader to reply to other comments on that post, thus the conversations will become much easier, more effective and more enjoyable
- Public and private comments: this ensures a better privacy for your visitors which can make their comments either public or private
- Edit or delete comments: your visitors will be able to edit any comments that they wrote even after publishing, so they don't have to write another comment explaining the correction
- Google Plus One (+1) button in comments: we can up-vote any comment by clicking this button. This is a great feature which could also help you to get some traffic from Google+
- "Also share on Google+" check box: with this option which is right below the comment editor, we will be able to share a specific comment on Google+ and thus get more traffic!

Things to consider before adding the Google Plus Comments in Blogger:

- the Google Plus commenting system won't work for private and adult blogs
- If you are using a third-party commenting system like Disqus, your comments might not be retained when you enable Google+ Comments
- If you change domain name, comments will be gone. Therefore, it would be highly recommended to implement the Google Plus commenting system only after you've decided to use a custom domain name
- If you choose to allow comments pending moderation, you will have to visit the post in order to approve, hide or delete comments before they are publicly visible
- Only registered Google+ users can comment, this means that visitors who don't have a Google+ account will not be able to comment on your blog

How to Enable Google Plus on Custom Blogger Templates


If you are using a custom blogger template, the comments might not show up after checking the "Use Google+ Comments on this blog" setting. In this case, we will need to apply the following trick in order to enable it on custom templates:

Step 1. From the Blogger Dashboard, go to Template and click on the Edit HTML button.

Step 2. Click anywhere inside the code area and press the Ctrl + F keys to open the Blogger search box.
Type or paste the following line inside the search box and hit Enter to find it:
<div class='post-footer'>
Step 3. Just below it, paste this code:
<div class='cmt_iframe_holder' data-viewtype='FILTERED_POSTMOD' expr:href='data:blog.canonicalUrl'/>
Step 4. Click on the Save template button to save the changes... and that's it. Now we should be able to enjoy the Google Plus comments in our Blogspot blogs.

Happy commenting!

Wednesday, 18 June 2014

Ara-Responsive CSS Timeline with 3D Effect for Blogger

Here's another amazing way to display the Blogger posts. By applying the following Responsive CSS Timeline View with 3D Effect on Blogger Posts, we will have a responsive timeline-like structure of the most recent posts and their thumbnails, along with some cool CSS effects. When clicking on the associated radio input, the posts snippet/summary will expand by changing their style and size and will rotate in 3D. The main structure of this timeline is an unordered list.


How to Add Responsive CSS Timeline View to Blogger Posts

Step 1. Go to Blogger dashboard > Template > click on the Edit HTML button:


Step 2. Click anywhere inside the code area and press the CTRL + F keys to open the search box:

blogger search box

Step 3. Type or paste the following tag inside the search box and hit Enter to find it:
</head>
Step 4. Just above the </head> tag, copy and paste the following style:
<b:if cond='data:blog.pageType != &quot;static_page&quot;'>
<b:if cond='data:blog.pageType != &quot;item&quot;'>
<style type='text/css'>
.post-body img, .post-body .tr-caption-container, .Profile img, .Image img,
.BlogList .item-thumbnail img {padding: 0px; border: 0px;}
.post-footer {display: none;}
.post {margin-bottom: 50px; padding-bottom: 0px; background: none; border: none;}
.jump-link a {display: none;}
  h3.post-title a {display: none;}
 .date-header {display: none;}
*,
.timeline:after,
.timeline:before {box-sizing: border-box;padding: 0; margin: 0;}
.timeline {position: relative;padding: 30px 0 50px 0;font-family: Arial, sans-serif;}
.timeline:before {content: &#39;&#39;;position: absolute;width: 5px;height: 100%;margin:0px;top: 0;left: 200px;background: url(data:image/png;base64,iVBORw0KGgoAAAANSUhEUgAAAAUAAAAFCAYAAACNbyblAAAAJUlEQVQIW2NkQAP/gYARWQwkAOLDBeECjEAAkkEWAKtEFwAJAgAZEBP+oM1IkwAAAABJRU5ErkJggg==);}
.event {position: relative;margin-bottom: 80px;padding-right: 40px;}
.thumb {position: absolute; width: 90px; height: 90px;box-shadow:
        0 0 0 8px rgba(65,131,142,1),
        0 1px 1px rgba(255,255,255,0.5);background-repeat: no-repeat;border-radius: 50%;-webkit-transform: scale(0.8) translateX(24px);-moz-transform: scale(0.8) translateX(24px);-o-transform: scale(0.8) translateX(24px);-ms-transform: scale(0.8) translateX(24px);transform: scale(0.8) translateX(24px);}
.thumb:before {content: &#39;&#39;;background: transparent url(data:image/png;base64,iVBORw0KGgoAAAANSUhEUgAAAAoAAAAICAYAAADA+m62AAAAPElEQVQYV2NkQAP/gYARCNDFUQRgirAphitEl0TngxXisg5ZnBGXIpgbYfIYjkb3BNxGbBLYxIgyEaQRAA8KKAWYsZtjAAAAAElFTkSuQmCC);position: absolute;height: 8px; z-index: -1; width: 50px;top: 42px; left: 100%;margin-left: 8px;
}
.thumb span {color: #41838e;width: 100%;text-align: center;font-weight: 700;font-size: 15px;text-transform: uppercase;position: absolute;bottom: -30px;}
.event label,.event input[type=&quot;radio&quot;] {width: 24px;height: 24px;left: 158px;top: 36px;position: absolute;display: block;}
.event input[type=&quot;radio&quot;] {opacity: 0;z-index: 10;cursor: pointer;}
.event label:after{content: &quot;\2713&quot;;background: #41838E;border-radius: 50%;color: #fff;font-size: 20px;height: 100%;width: 100%;font-weight: bold;left: -2px;top: -3px;line-height: 24px;position: absolute;text-align: center;}
.content-perspective { margin-left: 230px;position: relative;perspective: 600px;-webkit-perspective: 600px;-moz-perspective: 600px;-o-perspective: 600px;-ms-perspective: 600px;}
.content-perspective:before { content: &#39;&#39;; width: 34px; left: -44px; top: 48px;position: absolute;height: 1px; z-index: -2;background: #fff;}
.content {transform: rotateY(10deg);transform-origin: 0 0;transform-style: preserve-3d;}
.blog-post-body {position: relative;padding: 20px;color: #333; border-left: 5px solid #41838e;box-shadow: 0 4px 6px rgba(0,0,0,0.1);background: #fff;}
.blog-post-body h3 {border: none;margin: 0px;}
.blog-post-body h3 a{font-size: 21px;padding: 5px 0 5px 0;color: #41838e;margin: 0px;text-decoration: none;border: none;}
.event input[type=&quot;radio&quot;]:checked ~ .content-perspective .blog-post-body h3 a{color: #F26328;}
.blog-post-body p,.thumb span,.event label {-webkit-backface-visibility: hidden;}
.blog-post-body p {font-size: 15px;max-height: 0px; overflow: hidden; color: rgba(0,0,0,0);text-align: left;}
.blog-post-body:before {content: &#39;\25c2&#39;;font-weight: normal; line-height: 86px; font-size: 86px;position: absolute;color: #41838e; left: -41px;width: 100%;height: 100%; top: 3px;z-index: -1;}
.thumb,.thumb span,.blog-post-body h3 {transition: all 0.6s ease-in-out 0.2s;-webkit-transition: all 0.6s ease-in-out 0.2s;-moz-transition: all 0.6s ease-in-out 0.2s;-o-transition: all 0.6s ease-in-out 0.2s;-ms-transition: all 0.6s ease-in-out 0.2s;transition: all 0.6s ease-in-out 0.2s;}
.blog-post-body { transition: box-shadow 0.8s linear 0.2s;-webkit-transition: box-shadow 0.8s linear 0.2s;-moz-transition: box-shadow 0.8s linear 0.2s;-o-transition: box-shadow 0.8s linear  0.2s;-ms-transition: box-shadow 0.8s linear 0.2s;}
.content {transition: transform 0.8s cubic-bezier(.59,1.45,.69,.98) 0.2s;-webkit-transition: -webkit-transform 0.8s cubic-bezier(.59,1.45,.69,.98) 0.2s;-moz-transition: -moz-transform 0.8s cubic-bezier(.59,1.45,.69,.98) 0.2s;-o-transition: -o-transform 0.8s cubic-bezier(.59,1.45,.69,.98) 0.2s;-ms-transition: -ms-transform 0.8s cubic-bezier(.59,1.45,.69,.98) 0.2s;}
.blog-post-body p { transition: max-height 0.5s linear, color 0.3s linear;-webkit-transition: max-height 0.5s linear, color 0.3s linear;-moz-transition: max-height 0.5s linear, color 0.3s linear;-o-transition: max-height 0.5s linear, color 0.3s linear;-ms-transition: max-height 0.5s linear, color 0.3s linear;}
.event input[type=&quot;radio&quot;]:checked + label:after {content: &#39;\2714&#39;;color: #fff;background: #F26328;box-shadow: 0 0 0 5px rgba(255, 255, 255, 0.8);}
.event input[type=&quot;radio&quot;]:checked ~ .content-perspective:before {background: #F26328;}
 .event input[type=&quot;radio&quot;]:checked ~ .content-perspective .blog-post-body h3 { color: #F26328;}
.event input[type=&quot;radio&quot;]:checked ~ .content-perspective .content {transform: rotateY(-5deg);-webkit-transform: rotateY(-5deg);-moz-transform: rotateY(-5deg);-o-transform: rotateY(-5deg);-ms-transform: rotateY(-5deg);}
.event input[type=&quot;radio&quot;]:checked ~ .content-perspective .blog-post-body {border-color: #F26328;box-shadow: 10px 0px 10px -6px rgba(0, 0, 0, 0.1);}
.event input[type=&quot;radio&quot;]:checked ~ .content-perspective .blog-post-body p {max-height: 460px; color: rgba(0,0,0,0.6); transition-delay: 0s, 0.6s;-webkit-transition-delay: 0s, 0.6s;-moz-transition-delay: 0s, 0.6s;-o-transition-delay: 0s, 0.6s;-ms-transition-delay: 0s, 0.6s;}
.event input[type=&quot;radio&quot;]:checked ~ .content-perspective .blog-post-body:before {color: #F26328;}
.event input[type=&quot;radio&quot;]:checked ~ .thumb {transform: scale(1);box-shadow: 0 0 0 8px rgba(242,99,40,1), 0 1px 1px rgba(255,255,255,0.5); -webkit-transform: scale(1);-moz-transform: scale(1);-o-transform: scale(1);-ms-transform: scale(1);}
.event input[type=&quot;radio&quot;]:checked ~ .thumb span {color: #F26328;}
.event input[type=&quot;radio&quot;]:checked ~ .thumb:before {
background: transparent url(data:image/png;base64,iVBORw0KGgoAAAANSUhEUgAAAAoAAAAICAYAAADA+m62AAAAPUlEQVQYV2NkQAOfUjX+882+wYgujiIAU4RNMVwhuiQ6H6wQl3XI4oy4FMHcCJPHcDS6J2A2EqUQpJhohQBbNyaHFmzEqgAAAABJRU5ErkJggg==);}
@media screen and (max-width: 850px) {.blog-post-body h3 {font-size: 20px;}
 .blog-post-body p { font-size: 14px; text-align: justify; }
 .event input[type=&quot;radio&quot;]:checked ~ .content-perspective .blog-post-body p { max-height: 500px; }}
@media screen and (max-width: 540px) {.timeline:before { left: 50px;}
.event {padding-right: 0px; margin-bottom: 100px; }
 .thumb { transform: scale(0.8); -webkit-transform: scale(0.8);-moz-transform: scale(0.8);-o-transform: scale(0.8);-ms-transform: scale(0.8);}
 .event input[type=&quot;radio&quot;] { width: 100px;height: 100px;left: 0px;top: 0px; }
.thumb:before,.event input[type=&quot;radio&quot;]:checked ~ .thumb:before {background: none;width: 0;}
 .event label {display: none;}
 .content-perspective {margin-left: 0px;top: 80px;}
 .content-perspective:before {height: 0px; }
 .content { transform: rotateX(-10deg);-webkit-transform: rotateX(-10deg);-moz-transform: rotateX(-10deg);-o-transform: rotateX(-10deg);-ms-transform: rotateX(-10deg);}
 .event input[type=&quot;radio&quot;]:checked ~ .content-perspective .content { transform: rotateX(10deg);-webkit-transform: rotateX(10deg);-moz-transform: rotateX(10deg);-o-transform: rotateX(10deg);-ms-transform: rotateX(10deg);}
.blog-post-body {border-left: none;border-top: 5px solid #41838e;}
.event input[type=&quot;radio&quot;]:checked ~ .content-perspective .blog-post-body {border-color: #F26328;box-shadow: 0 10px 10px -6px rgba(0, 0, 0, 0.1);}
.blog-post-body:before {content: &#39;\25b4&#39;;left: 33px; top: -32px;}
.event input[type=&quot;radio&quot;]:checked ~ .content-perspective .blog-post-body p {max-height:300px; }}
ul.timeline {list-style-type: none;}
</style>
</b:if>
</b:if>

Step 5. Search for the SECOND instance of this code below (hit Enter two times):
<data:post.body/>

Note: depending on the template you are using, you could find more lines like this one above. Therefore, if you don't see any changes after saving the template, try to replace the last one, as well.

Also, please note that if you are using the Read more function, you may need to remove it in order to make it work.

Step 6. After you found <data:post.body/> - replace it this code:
<b:if cond='data:blog.pageType != &quot;static_page&quot;'>
<b:if cond='data:blog.pageType != &quot;item&quot;'>
<ul class='timeline'><li class='event'><input checked='checked' name='tl-group' type='radio'/><label/>
<b:if cond='data:post.thumbnailUrl'><img class='thumb' expr:alt='data:post.title' expr:src='data:post.thumbnailUrl'/></b:if><div class='thumb'><b:if cond='data:post.dateHeader'><span><data:post.dateHeader/></span></b:if></div>
<div class='content-perspective'><div class='content'><div class='blog-post-body'><h3><b:if cond='data:post.link'><a expr:href='data:post.link'><data:post.title/></a><b:else/><b:if cond='data:post.url'><b:if cond='data:blog.url != data:post.url'><a expr:href='data:post.url'><data:post.title/></a><b:else/><data:post.title/></b:if><b:else/><data:post.title/></b:if></b:if></h3><p><b:if cond='data:blog.pageType != &quot;item&quot;'>
<b:if cond='data:blog.pageType != &quot;static_page&quot;'><data:post.snippet/></b:if></b:if></p></div></div></div></li></ul></b:if></b:if>
<b:if cond='data:blog.pageType == &quot;item&quot;'><data:post.body/></b:if>
<b:if cond='data:blog.pageType == &quot;static_page&quot;'><data:post.body/></b:if>
Step 7. Finally, click on the Save template button to save the changes.

Now, we will need to make some small adjustments in order to make the posts date appear correctly:
Go to Layout and click on the Edit link just below the Blog posts area. When the pop-up window appears, check the date option and choose to display the date in the following order (date/month/year):

Auto Read More with thumbnail for Blogger/Blogspot Posts

How to make posts in the blog homepage to be displayed with an automatic "read more" button and a thumbnail.

To be more specific, this will show the title of the post, then a short summary with a number of characters and a thumbnail, that will be the thumbnail of the first image uploaded inside the post. After the thumbnail and the post summary, there will be a "Read More" link, which when you click on it, will take you to the actual post.
This Automatic Read More script will summarize content and a post summary will be shown only on the main blog page (homepage), category pages, and archive pages.


Using the Automatic Read More feature in Blogger Posts

Step 1. From your Blogger dashboard, go to Template and click on the Edit HTML button:


Step 2. Click anywhere inside the code area, then press the CTRL + F keys and search for this code:
<data:post.body/>
Note: after hitting Enter, you'll find this code more than once but you need to stop at the third one.

Step 3. Replace the code above with this one:
<b:if cond='data:blog.pageType != &quot;static_page&quot;'>
<b:if cond='data:blog.pageType != &quot;item&quot;'>
<div expr:id='&quot;summary&quot; + data:post.id'><data:post.body/></div>
<script type='text/javascript'>createSummaryAndThumb(&quot;summary<data:post.id/>&quot;,&quot;<data:post.url/>&quot;,&quot;<data:post.title/>&quot;);</script>
 <span class='readmore' style='float:right;'><a expr:href='data:post.url'>Read More &#187;</a></span></b:if></b:if>
<b:if cond='data:blog.pageType == &quot;item&quot;'><data:post.body/></b:if>
<b:if cond='data:blog.pageType == &quot;static_page&quot;'><data:post.body/></b:if>
Note: if you don't see any changes after going through all the steps, please try to replace the second <data:post.body/> as well.

Step 4. Now search for the following tag:
</head>
Step 5. Just above the </head> tag, add the following code:
<script type='text/javascript'>
posts_no_thumb_sum = 490;
posts_thumb_sum = 400;
img_thumb_height = 160;
img_thumb_width = 180;
</script>
<script type='text/javascript'>
//<![CDATA[
function removeHtmlTag(strx,chop){
if(strx.indexOf("<")!=-1)
{
var s = strx.split("<");
for(var i=0;i<s.length;i++){
if(s[i].indexOf(">")!=-1){
s[i] = s[i].substring(s[i].indexOf(">")+1,s[i].length);
}
}
strx = s.join("");
}
chop = (chop < strx.length-1) ? chop : strx.length-2;
while(strx.charAt(chop-1)!=' ' && strx.indexOf(' ',chop)!=-1) chop++;
strx = strx.substring(0,chop-1);
return strx+'...';
}
function createSummaryAndThumb(pID, pURL, pTITLE){
var div = document.getElementById(pID);
var imgtag = "";
var img = div.getElementsByTagName("img");
var summ = posts_no_thumb_sum;
if(img.length>=1) {
imgtag = '<span class="posts-thumb" style="float:left; margin-right: 10px;"><a href="'+ pURL +'" title="'+ pTITLE+'"><img src="'+img[0].src+'" width="'+img_thumb_width+'px" height="'+img_thumb_height+'px" /></a></span>';
summ = posts_thumb_sum;
}

var summary = imgtag + '<div>' + removeHtmlTag(div.innerHTML,summ) + '</div>';
div.innerHTML = summary;
}
//]]>
</script>

<b:if cond='data:blog.pageType != &quot;static_page&quot;'>
<b:if cond='data:blog.pageType != &quot;item&quot;'>
<style type='text/css'>
.post-footer {display: none;}
.post {margin-bottom: 10px; border-bottom: 1px dotted #E6E6E6; padding-bottom: 20px;}
 .readmore a {text-decoration: none; }
</style>
</b:if>
</b:if>
Note: 

- To change the number of characters shown when there is no thumbnail, modify the 490 value in blue. For the number of characters shown when a post has a thumbnail, modify the 400 value.
- If you want larger thumbnails, modify the 160 (height) and 180 (width) values in red.

Step 6. Click on the Save template button to save the changes.

That's it, enjoy!

How to Create Magazine Style with Post Summaries and Thumbnails on Blogger

The magazine or newspaper style templates are those that display the posts summaries in the homepage by stacking the columns on top of each other. This kind of templates is very popular nowadays, whether it is a news or technology blog, everyone needs a fresh magazine style layout for their blogs.

blogger tricks, blogger widgets, blogger templates
There are several ways to make posts appear this way. An option would be to use the Read more script to display a summary of the posts and add a conditional tag and a different style to the first post so that it will have a larger width than the older posts. So, in this tutorial I will show you how to create a magazine style for a Blogger Template. By following this tutorial, you can transform your boring and simple Blogger template to have an attractive and stylish magazine style layout.

Adding the Magazine/Newspaper style to the Blogger Template

Step 1. Before anything please make a backup of your current template to make sure that you won't lose anything important - just log in on your Blogger Dashboard and go to Template, then click on the Backup/Restore button. After you've got a copy of the xml template, click on the Edit HTML button:

blogger edit html template

Step 2. Click anywhere inside the code area and search by using CTRL + F keys for this line:
<data:post.body/>
Note: You'll find it more than once, but stop to the second one in order to see the changes.

Step 3. Remove that line and instead it add this code:
<b:if cond='data:blog.pageType != &quot;item&quot;'>
<b:if cond='data:blog.pageType != &quot;static_page&quot;'>
 <span class='post-comment-link'><b:if cond='data:blog.pageType != &quot;item&quot;'><b:if cond='data:post.allowComments'><a class='comment-link' expr:href='data:post.addCommentUrl' expr:onclick='data:post.addCommentOnclick'><data:post.numComments/></a></b:if></b:if></span>
<div expr:id='&quot;summary&quot; + data:post.id'><data:post.body/></div>
  <script type='text/javascript'>createSummaryAndThumb(&quot;summary<data:post.id/>&quot;);</script>
<span class='readmorebutton' style='float:right'><a expr:href='data:post.url'>Read More &#187;</a></span></b:if></b:if>
<b:if cond='data:blog.pageType == &quot;item&quot;'><data:post.body/></b:if>
<b:if cond='data:blog.pageType == &quot;static_page&quot;'><data:post.body/></b:if>
Note: you can replace the Read More text, by changing the code in red

Step 4. Now find (CTRL + F) this line:
<b:include data='post' name='post'/>
Step 5. Remove this as well and instead of it add this:
<b:if cond='data:post.isFirstPost'>
<b:if cond='data:blog.homepageUrl == data:blog.url'>
<div id='first'>
<b:if cond='data:post.title'>
<h3 class='post-title entry-title'>
<b:if cond='data:post.link'>
<a expr:href='data:post.link'><data:post.title/></a>
<b:else/>
<b:if cond='data:post.url'>
<a expr:href='data:post.url'><data:post.title/></a>
<b:else/>
<data:post.title/>
</b:if>
</b:if>
</h3>
</b:if>
<div class='first-body'>

<b:if cond='data:blog.pageType != &quot;item&quot;'>
<b:if cond='data:blog.pageType != &quot;static_page&quot;'>
<div expr:id='&quot;summary1&quot; + data:post.id'><data:post.body/></div>
  <script type='text/javascript'>createSummaryAndThumb1(&quot;summary1<data:post.id/>&quot;);</script>
<span class='post-comment-link'><b:if cond='data:blog.pageType != &quot;item&quot;'><b:if cond='data:post.allowComments'><a class='comment-link' expr:href='data:post.addCommentUrl' expr:onclick='data:post.addCommentOnclick'><data:post.numComments/></a></b:if></b:if></span>
<span class='readmorebutton' style='float:right'><a expr:href='data:post.url'>Read More &#187;</a></span>
</b:if></b:if>
<b:if cond='data:blog.pageType == &quot;item&quot;'><data:post.body/></b:if>
<b:if cond='data:blog.pageType == &quot;static_page&quot;'><data:post.body/></b:if>

</div>
</div>
<b:else/>
<b:include data='post' name='post'/>
</b:if>
<b:else/>
<b:include data='post' name='post'/>
</b:if>
Note: you can change the Read More text here also, just replace the code in red with the text that you want to show.

Step 6. Now find the </head> tag and paste the following script before/above it:
<script type='text/javascript'>
posts_no_thumb_sum = 290;
posts_thumb_sum = 240;
img_thumb_height = 80;
img_thumb_width = 80;
first_no_thumb_sum = 600;
first_thumb_sum = 540;
img_thumb_height1 = 145;
img_thumb_width1 = 165;
</script>

<script type='text/javascript'>
//<![CDATA[
function removeHtmlTag(strx,chop){
if(strx.indexOf("<")!=-1)
{
var s = strx.split("<");
for(var i=0;i<s.length;i++){
if(s[i].indexOf(">")!=-1){
s[i] = s[i].substring(s[i].indexOf(">")+1,s[i].length);
}
}
strx = s.join("");
}
chop = (chop < strx.length-1) ? chop : strx.length-2;
while(strx.charAt(chop-1)!=' ' && strx.indexOf(' ',chop)!=-1) chop++;
strx = strx.substring(0,chop-1);
return strx+'...';
}

function createSummaryAndThumb(pID){
var div = document.getElementById(pID);
var imgtag = "";
var img = div.getElementsByTagName("img");
var summ = posts_no_thumb_sum;
if(img.length>=1) {
imgtag = '<span class="posts-thumb" style="float:left;"><img src="'+img[0].src+'" width="'+img_thumb_width+'px" height="'+img_thumb_height+'px"/></span>';
summ = posts_thumb_sum;
}

  var summary = imgtag + '<div>' + removeHtmlTag(div.innerHTML,summ) + '</div>';
div.innerHTML = summary;
}

function createSummaryAndThumb1(pID){
var div = document.getElementById(pID);
var imgtag = "";
var img = div.getElementsByTagName("img");
var summ = first_no_thumb_sum;
if(img.length>=1) {
imgtag = '<span class="first-post-thumb" style="float:left;"><img src="'+img[0].src+'" width="'+img_thumb_width1+'px" height="'+img_thumb_height1+'px"/></span>';
summ = first_thumb_sum;
}

var summary1 = imgtag + '<div>' + removeHtmlTag(div.innerHTML,summ) + '</div>';
div.innerHTML = summary1;
}

//]]>
</script>
Step 7. And below the script above add these CSS styles:
<b:if cond='data:blog.pageType != &quot;static_page&quot;'>
<b:if cond='data:blog.pageType != &quot;item&quot;'>
<style type='text/css'>
.first-post-thumb {
margin-right: 10px;
border: 1px solid #fff;
-webkit-box-shadow: 2px 2px 5px rgba(0,0,0,0.3);
-moz-box-shadow: 2px 2px 5px rgba(0,0,0,0.3);
box-shadow: 2px 2px 5px rgba(0,0,0,0.3);
}
.post-body img, .post-body .tr-caption-container, .Profile img, .Image img, .BlogList .item-thumbnail img {
background: none;
border: none;
box-shadow: none;
padding: 0;
}
#first { /* Styles for the First Post Container */
width: auto;
height: 250px;
float: left;
margin-bottom:10px;
background-color: #F4F4F4; /* background color for the first post */
border: 1px solid #E5E5E5; /* border for the first post */
}
.first-body { /* Style for the First Post summary */
color: #545454;
font-size: 13px;
text-align: justify;
padding: 5px 10px;
line-height:1.5em;
}
#first h3 a, #first h3 a:visited { /* Style for the First Post Title*/
border-bottom: 2px solid #DFDFDF;
color: #515151;
font-size: 20px;
display:block;
margin: 10px auto;
width: 95%;
font-size: 20px;
padding: 0px 0px 4px 0px;
font-weight: bold;
text-align:left;
line-height: 1.4em;
background: none;
}
#first h3 a:hover { /* Color on mouseover for the First Post Title */
color: #1061A1;
}
.post { /* Styles for the small posts container */
float:left;
margin-right: 10px;
width: 290px;
height: 210px;
padding: 0px 5px 5px 5px;
background: #FCFCFC; /* background color for the small posts */
border: 1px solid #E5E5E5; /* border for the small posts */
overflow: hidden;
}
.posts-thumb { /* Style for the small posts thumbnails */
margin-right: 5px;
background: #ddd;
padding: 3px 3px 0px;
border: 1px solid #C4C4C4;
border-radius: 4px;
}
h3.post-title a{ /* Style for the small posts titles */
font-size: 14px;
color: #747474;
background-color: #F4F4F4; /* Background color for the small posts titles */
width: 95%;
font-weight: bold;
font-family: 'Arial Narrow', sans-serif;
padding: 5px;
}
h3.post-title a:hover { /* Color on mouseover for the Small Posts Title */
color: #005B77;
}
h2.date-header { /* Hide the post date */
display:none;
}
.post-footer { display: none;}
h3.post-title {margin: 0px;}
.readmorebutton { margin-top: 5px;}

.readmorebutton a { /* Styles for the Read More link */
color: #767676;
border: 1px solid #E1E1E1;
background: #EAEAEA; /* Background color for the Read More link */
text-decoration:none;
padding: 3px 5px;
font-weight: bold;
font-size: 11px;
}
.post-comment-link { /* Style for the comment bubble of posts below */
float: right;
display: inline;
margin: -35px 0px;
border: 1px solid #E1E1E1; /* border for the comment bubble */
background: #EAEAEA; /* background color for the comment bubble */
font-size: 11px;
position: relative;
-webkit-border-radius: 100px;
-moz-border-radius: 100px;
border-radius: 100px;
}
#first .post-comment-link { /* Style for the comment bubble of first post */
margin: -200px 10px;
}
.post-comment-link a{ /* Link color for the comments bubble*/
padding: 10px;
color: #6A6A6A;
text-decoration:none;
font-weight: bold;
}
#blog-pager {clear:both;}
</style>
</b:if>
</b:if>
Customization:

1) At the beginning of the script from step 6, we have this section:
posts_no_thumb_sum = 290;
posts_thumb_sum = 240;
img_thumb_height = 80;
img_thumb_width = 80;
first_no_thumb_sum = 600;
first_thumb_sum = 540;
img_thumb_height1 = 145;
img_thumb_width1 = 165;
- The first number is the number of characters that will show for the small posts when there will be no image available
- The second number will be the number of characters that will show when the small posts will have an image
- The third and the forth line is for the height and width of the small posts thumbnails (images).
- The same goes for what is in blue, but this configuration affects only the first post. Since the first post is wider, it may contain a larger number of characters and we'll be able to make the thumbnail size larger.

2) And finally, we have the CSS styles. That last thing we added is a code that determines how the posts are going to look on the homepage (and archive pages as well, except for the first post).

To change the width an height, respectively the size for the first post container, look for these lines:
width: auto;
height: 250px;
Underneath the first post are the values for the other posts, just look for this part:
width: 290px;
height: 210px;
So, width is the width and height is the height of the other posts container. There you will have to experiment a bit with the sizes in order to make them appear correctly.

Finally set the number of posts to show on the homepage so that there will never be any empty space. Go to Settings >> Posts and comments >> Show at most and select the number of posts that you want to appear.

By Ara websites

Random posts widget with thumbnails and summary for blogger

When your blog has too many posts, visitors don't always have the time or desire to go through all the posts written there in order to make an idea of the blog's content. Thus, a random posts widget that will allow visitors to find content more easily could be really useful. This tutorial will show you how to add a random posts widget to display a list of posts in a random order with thumbnails and excerpts.


Steps to Show Random Posts with Thumbnails and Posts Summary in Blogger


Step 1. Login to your blogger account, select your blog and go to Layout.

Step 2. Add new widget by clicking on the Add a gadget link and select Html/JavaScript from the popup window.
html javascript widget, blogger gadgets

Step 3. After adding the Html/Javascript you need to grab the following code with styles attached.
<style>
#random-posts img{border-radius: 10px;float:left;margin-right:5px;
width:75px;height:75px;background-color: #F5F5F5;padding: 3px;transition: all 0.2s linear 0s;}
#random-posts img:hover{opacity: 0.6;}
ul#random-posts {list-style-type: none;padding: 0px;}
#random-posts a {font-size: 12px;text-transform:uppercase; padding: 0px auto 5px;}
#random-posts a:hover {text-decoration: none;}
.rp-snippet {font-size: 11px;background: none; padding: 5px; margin-right: 8px;}
#random-posts span {}
#random-posts li {margin-bottom: 10px;border-bottom: 1px solid #EEEEEE; padding: 4px;}
</style>
<ul id='random-posts'>
<script type='text/javaScript'>
var rdp_numposts=5;
var rdp_snippet_length=110;
var rdp_info='yes';
var rdp_comment='Comments';
var rdp_disable='Comments Disabled';
var rdp_current=[];var rdp_total_posts=0;var rdp_current=new Array(rdp_numposts);function totalposts(json){rdp_total_posts=json.feed.openSearch$totalResults.$t}document.write('<script type=\"text/javascript\" src=\"/feeds/posts/default?alt=json-in-script&max-results=0&callback=totalposts\"><\/script>');function getvalue(){for(var i=0;i<rdp_numposts;i++){var found=false;var rndValue=get_random();for(var j=0;j<rdp_current.length;j++){if(rdp_current[j]==rndValue){found=true;break}};if(found){i--}else{rdp_current[i]=rndValue}}};function get_random(){var ranNum=1+Math.round(Math.random()*(rdp_total_posts-1));return ranNum};
</script>
<script type='text/javaScript'> 
function random_posts(json){for(var i=0;i<rdp_numposts;i++){var entry=json.feed.entry[i];var rdp_posttitle=entry.title.$t;if('content'in entry){var rdp_get_snippet=entry.content.$t}else{if('summary'in entry){var rdp_get_snippet=entry.summary.$t}else{var rdp_get_snippet="";}};rdp_get_snippet=rdp_get_snippet.replace(/<[^>]*>/g,"");if(rdp_get_snippet.length<rdp_snippet_length){var rdp_snippet=rdp_get_snippet}else{rdp_get_snippet=rdp_get_snippet.substring(0,rdp_snippet_length);var space=rdp_get_snippet.lastIndexOf(" ");rdp_snippet=rdp_get_snippet.substring(0,space)+"&#133;";};for(var j=0;j<entry.link.length;j++){if('thr$total'in entry){var rdp_commentsNum=entry.thr$total.$t+' '+rdp_comment}else{rdp_commentsNum=rdp_disable};if(entry.link[j].rel=='alternate'){var rdp_posturl=entry.link[j].href;var rdp_postdate=entry.published.$t;if('media$thumbnail'in entry){var rdp_thumb=entry.media$thumbnail.url}else{rdp_thumb="https://blogger.googleusercontent.com/img/b/R29vZ2xl/AVvXsEjkALr22bhHClwj4Zbqri7F1E0JwYFNF7yGju5BAkEWeh64BAnLksrDGK1-ryiSCSKtbq3H-Fm9leGJQ8r830pdDQzqgLluZtd47U_qzTkl3AZ19roXpUKr6LAPYUtB7LH1EV5b5PxRCVA/s1600/no_thumb.png"}}};document.write('<li>');document.write('<a href="'+rdp_posturl+'" rel="nofollow"><img alt="'+rdp_posttitle+'" src="'+rdp_thumb+'"/></a>');document.write('<div><a href="'+rdp_posturl+'" rel="nofollow" title="'+rdp_snippet+'">'+rdp_posttitle+'</a></div>');if(rdp_info=='yes'){document.write('<span><div  class="rp-info">'+rdp_postdate.substring(8,10)+'/'+rdp_postdate.substring(5,7)+'/'+rdp_postdate.substring(0,4)+' - '+rdp_commentsNum)+'</div></span>'};document.write('<br/><div class="rp-snippet">'+rdp_snippet+'</div><div style="clear:both"></div></li>')}};getvalue();for(var i=0;i<rdp_numposts;i++){document.write('<script type=\"text/javascript\" src=\"/feeds/posts/default?alt=json-in-script&start-index='+rdp_current[i]+'&max-results=1&callback=random_posts\"><\/script>')};
</script>
</ul>
Step 4. Just paste this in the widget area and give widget the title of "Random Posts".

Random Posts Options

- Thumbnail dimensions: to change the size of the thumbnails in pixels, replace the 75px value.
- Summary length: you can control the the length of the summary (in characters) by changing the 110 value from var rdp_snippet_length=110;
- Post info: if you want to hide the post date and comment count change 'yes' from var rdp_info='yes'; to 'no';
- Font Size for Posts Titles and Summary: to modify the font size for the post snippet modify the 11px value and for the posts title, the 12px value;

Step 5. Click on the Save button and you're done! Your sidebar will display a random posts widget on each of your blog pages.

how to remove blogger navbar

WHAT IS BLOGGER NAVBAR?
Blogger has got a Navigation Bar that appears by default at the top of every Blogger-powered blog. This navigation bar can be very useful when you are blogging, but sometimes, it can get in the way. The Blogger navbar is usually hidden in most of the third party templates.

How to Add Page Elements to Blogger Header

Adding page Elements to Blogger Blogs

When you create a Blogger Blog the template comes with a pre-defined number of page elements. If you would like to increase the number the following step by step tutorial will show you how. This lesson will deal with adding more Page Elements to the Header section of your Blogger Template.

Update Oct 2008 - Since this post was written Blogger has changed the name "Element" to "Widget". Don't be confused as "widget" is the same thing as "element".

Always download a backup before making changes.

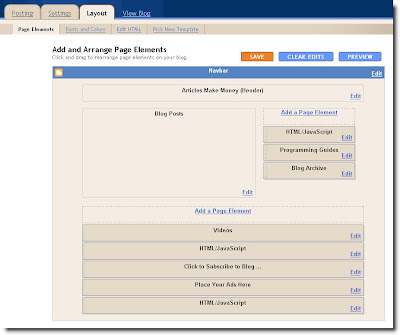
The screenshot below shows a standard Blogger Minima Template.

Click all images to enlarge.


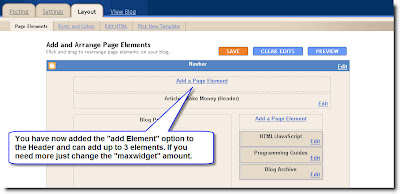
As you can see there is only one element available for the Header section on top.

This is how you can add more.

Under "layout" click "Edit HTML".

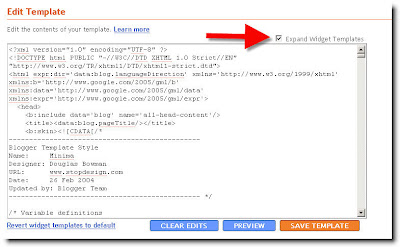
Click the "Expand Widget Template" Box.


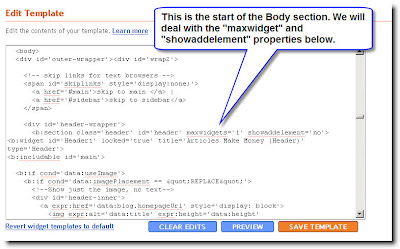
Scroll down until you come to the section that looks like this;


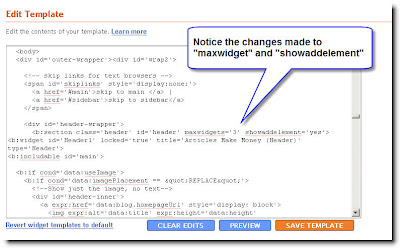
As you can see the "maxwidget" is set to 1 - this means that there is only one widget (element) available for use in the Header. You can change this to whatever amount you like. I am going to change it to 3.

After making the change be sure to change the "showaddelement" to "yes" so that you will see the option to add another element on the "layout" page.


Click "Save Template" and you are done.

Your "Layout" - "Page Elements" page should now look like this.


And that is how you can add or modify the page elements in Blogger. I will show you how to do this with the other sections in future posts but you may want to try it on your own. The process is the same for all the sections - Main Wrapper, Sidebar Wrapper and Footer.

Cheers,

Ali raza afzal

How to Change the Width of Blogger Blogs

Here is a quick tutorial showing you how to add an Adsense block to your blogger blog above the Post title. I have been asked this question frequently as I do this on my main Make Money blog. The reason for doing this is not so obvious - it really comes down to the fact that I have found much higher CTR (click thru rate) with the ads placed above the title rather than the more common position below the title.

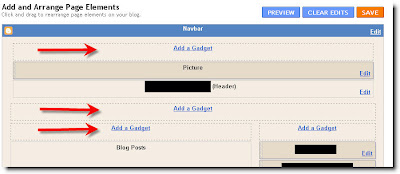
The process involves adding "Add a Gadget" boxes to your existing template. Please see How to Add a Page Element (Gadget) to Blogger Header


Rather than re-hashing the steps just follow the instructions in the linked post. This will allow you to add the necessary boxes for adding gadgets above the Post box as well as above the whole main wrapper and the header. See the image above.

Once you have added these boxes you can now add adsense (or anything else you like) above the post title by adding the adsense script in the box above the Post.


I should mention that I never use the Blogger "Add Adsense" gadget. This does not allow you to use channels and is restricting. I always set up my ads in Google Adsense Set Up and then copy/paste the code directly into the "Add a Gadget" box on Blogger. Just select "add HTML/JavaScript" from the options - insert the Adsense code supplied by Google and you are done.

How to Change the Width of Blogger Blogs

Modifying the Width of Your Blogger Blog

Here is a quick step by step tutorial on how to change the width of your Blogger Blog.

I have provided screenshots of each step - just follow along and you shouldn't have any problems.

Before you start create a backup of your current blog just in case there is a problem.

I will show you how to change the standard template so that the width is the same as this blog. This basically entails 4 things. First you increase the width of the Outer Wrapper and then you increase the width of the Header and then the two columns inside the outer wrapper. This would be the Post column and then the Sidebar column. Lastly you increase the width of your Footer.

You can click on all images to enlarge them.

Step One

Open "Layout" and choose the "Edit HTML" option.


Note: I am using the Minima Template for this demonstration - if you have a different template just find the appropriate section - the steps are the same.

Step Two

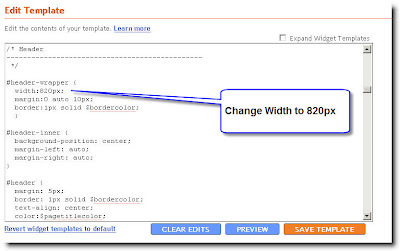
Scroll down to the Header section and change the Header Wrapper width to 820px


Step Three

Scroll down to the Outer Wrapper section and change the width to 850px


Step Four

Change the Outer Wrapper "Text-Align" to "left"


Step Five

Change the Main Wrapper width to 550px - this is located right below the Outer Wrapper section. The Main Wrapper is your Post Column.


Step Six

Change the Main Wrapper "float" to "left".


Step Seven

Change the Sidebar Wrapper width to 270px. The Sidebar Wrapper is located right below the Main Wrapper.


Step Eight

Change the Sidebar Wrapper "float" to "right".


Step Nine

Scroll down to the Footer section and change the width to 850px.


Click "Save Template" and you are done.

This is what you have just done;

You widened the size of your usable blog space to 850px. ( The Outer Wrapper )

Inside the Outer Wrapper you have changed the width of the Three Sections that make up your blog.

1) The Header section - 820px

2) The Main Wrapper section which consists of your two columns;

- The Post Column - 550px
- The Sidebar column - 270px

3) The Footer section - 850px

You will notice the Header section is 30px less than the Outer Wrapper.

The two columns add up to 820px - also 30px less than the Outer Wrapper.

I have made the Footer the same size as the Outer Wrapper.